Accounting is an important component that allows businesses to manage their financial information properly. Odoo is a whole suite of software for managing businesses.
Keeping track of purchase receipts, which verify the delivery of goods or services from suppliers, is an important aspect of accounting.
A buy bill and receipt serve various purposes in Odoo 17 accounting and purchase modules. A buy receipt is a tangible receipt issued by a vendor that acknowledges the delivery of goods or services to the business.
A purchase bill, on the other hand, is a financial document that indicates the vendor’s request for payment and specifies the amount owed to them for the goods or services acquired.
To maintain successful inventory control and financial management. It is important to grasp the differences between these sheets. This blog post will explain how to create and activate purchase receipts in Odoo accounting.
Configuring Purchase Receipts
To create buy receipts in Odoo 17 Accounting, go to the Odoo Accounting module first. The ‘Settings’ page is under the ‘Configuration’ menu. To generate buy receipts, activate the ‘buy receipt’ option in the ‘vendor bills’ field, as seen in the image below.

The Receipts option will now be available in the vendor's tab of the Odoo 17 Accounting module.
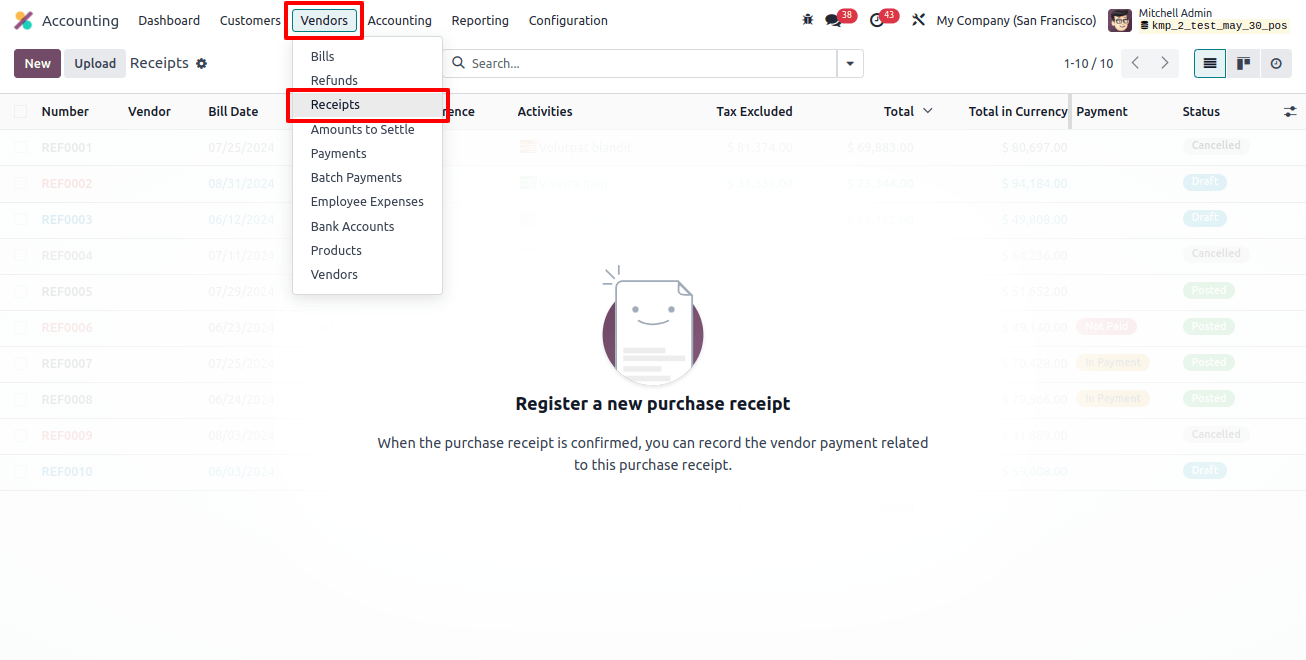
When you select the ‘Receipts’ list, you will be taken to the Receipts dashboard page, which displays all previously created purchase receipts.
This preview view displays the default receipt data, which includes the number, vendor, bill date, due date, reference, activities tax excluded, total, payment, people status, and many other details.
You can display the receipt’s status in a certain color format. Selecting them will provide full details. The receipts window shows a detailed list of all purchase receipts.
We can upload receipt papers from your device’s storage by clicking the ‘upload’ button. To create a new receipt, use the ‘New’ button.
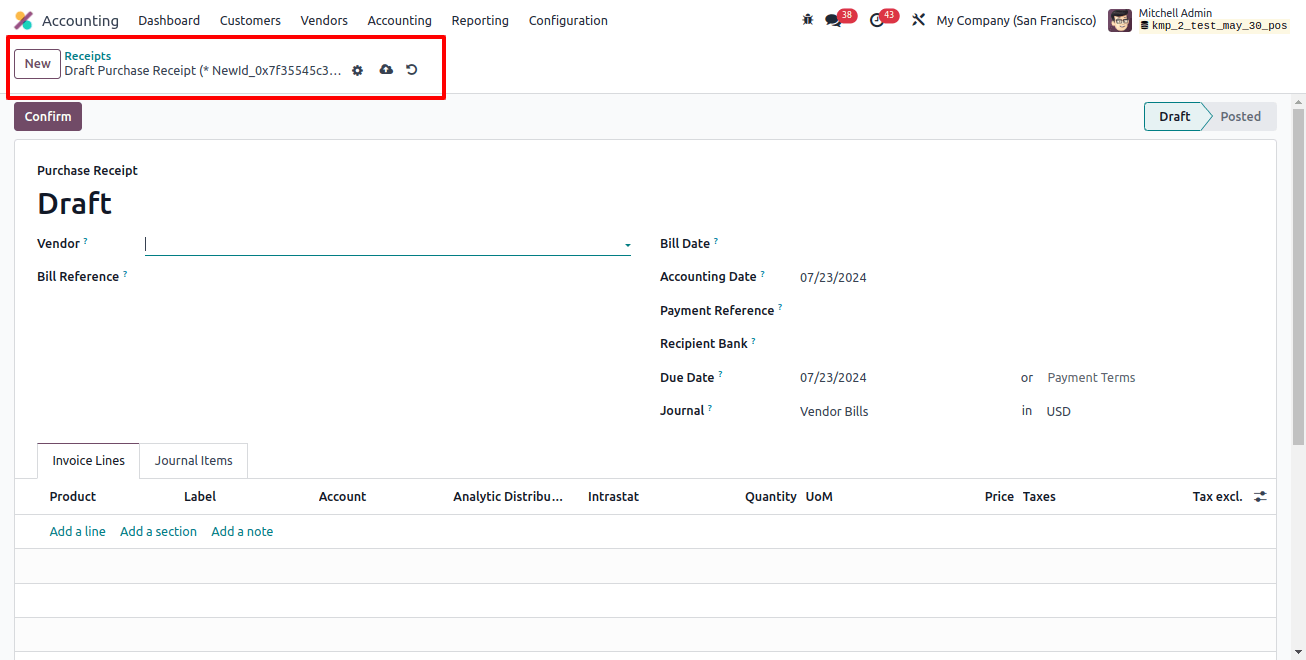
Fill out the right fields on the presented form page, including the vendor, bill reference, bill date, accounting date, payment reference, recipient bank, due date, journal, and so on.
After entering the products and journal items, save the information, confirm the receipt order with the ‘confirm’ button, and register the payment with the ‘register payment’ button.
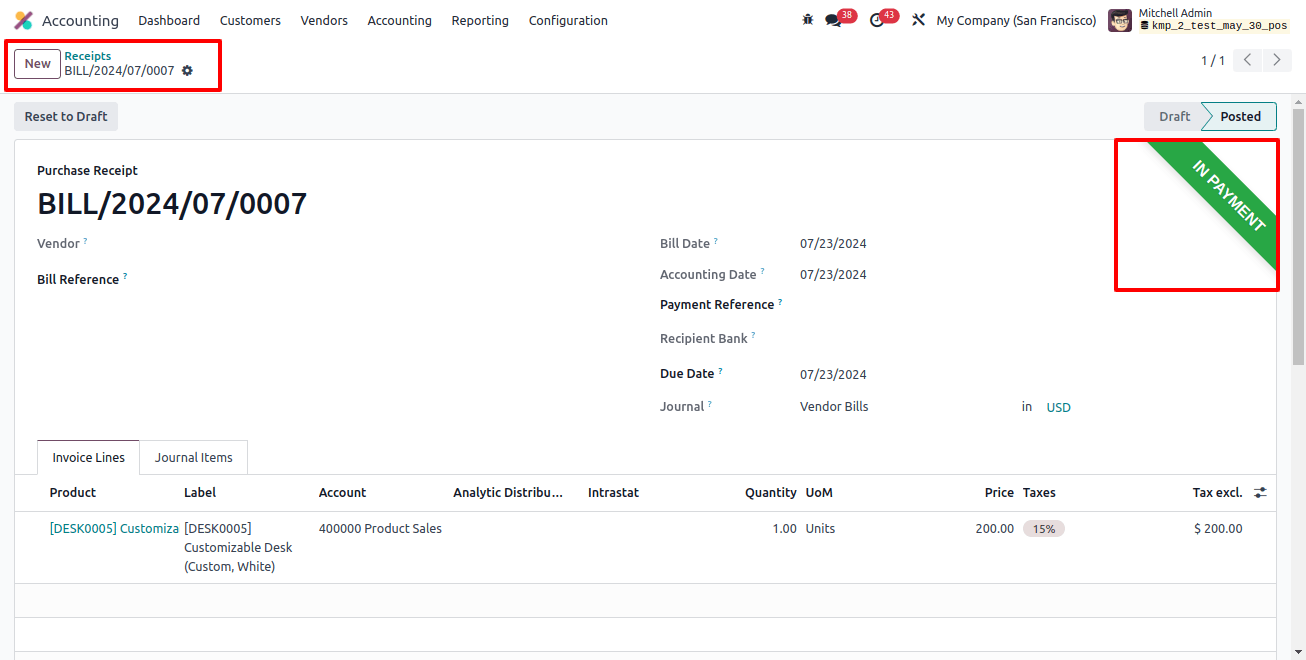
The ‘in payment’ ribbon will appear green, as shown in the image above.
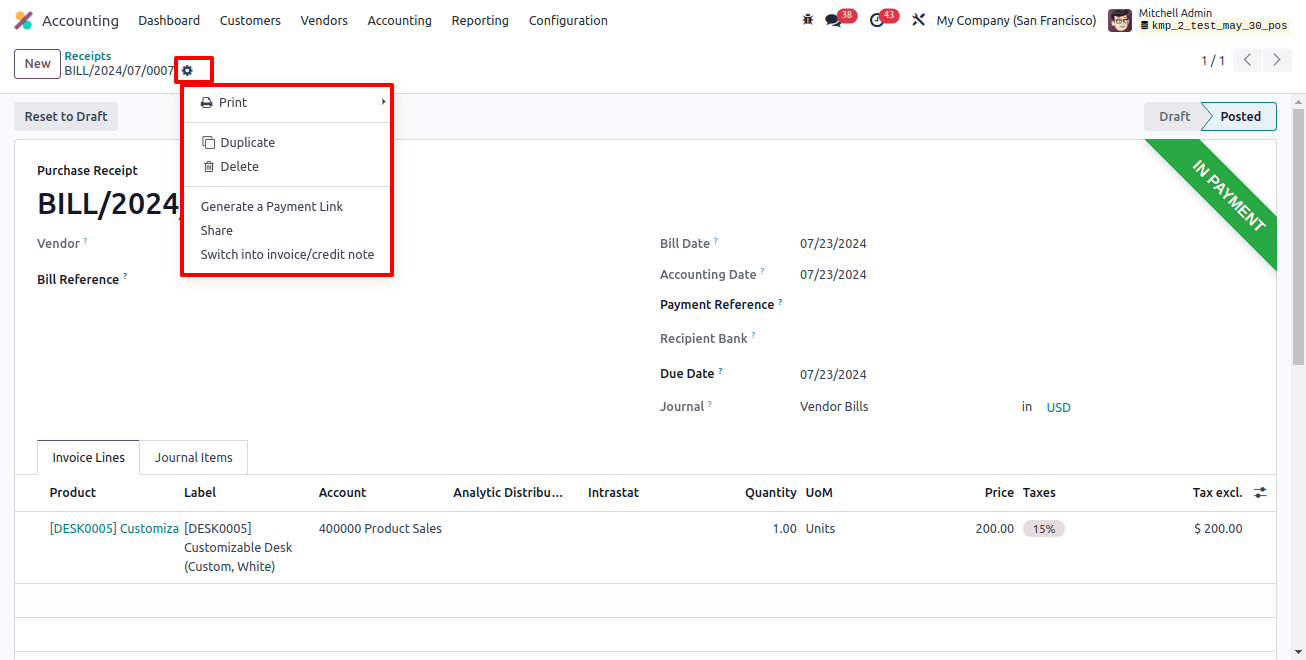
Within the ‘action’ menu, you can print, duplicate, delete, generate a payment link, share, and switch between refund/credit and debit note options.
The ‘receipts’ dashboard window, seen below, displays the newly created receipt data.

The Kanban list icon can access the ‘receipts’ field in the Kanban view. The platform provides several options for sorting and organizing data within the advanced search box to provide speedy searches.

Users can apply default and personalized filters to records in the ‘Filters’ section. Some filters available include My Invoices, draft, posted, canceled, to check, SDD Mandate, unpaid, paid, overdue, and more. Users can personalize filters by selecting the ‘Add Custom Filter’ option.
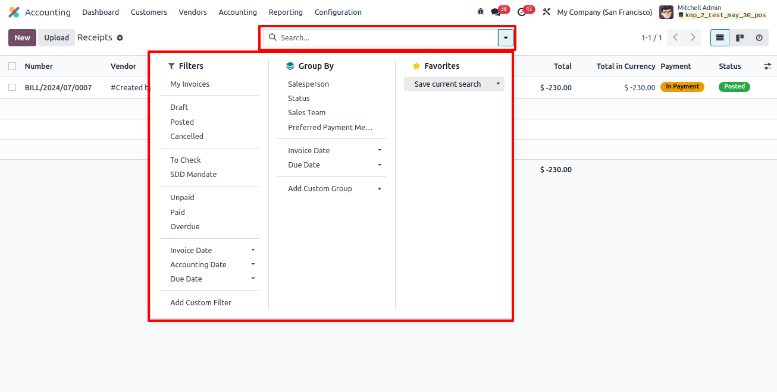
The ‘Group by’ option allows you to group dashboard data by salesperson, status, GSTER 2B Status, Sales Team, Peppol Team, Invoice Date, and Referrer.
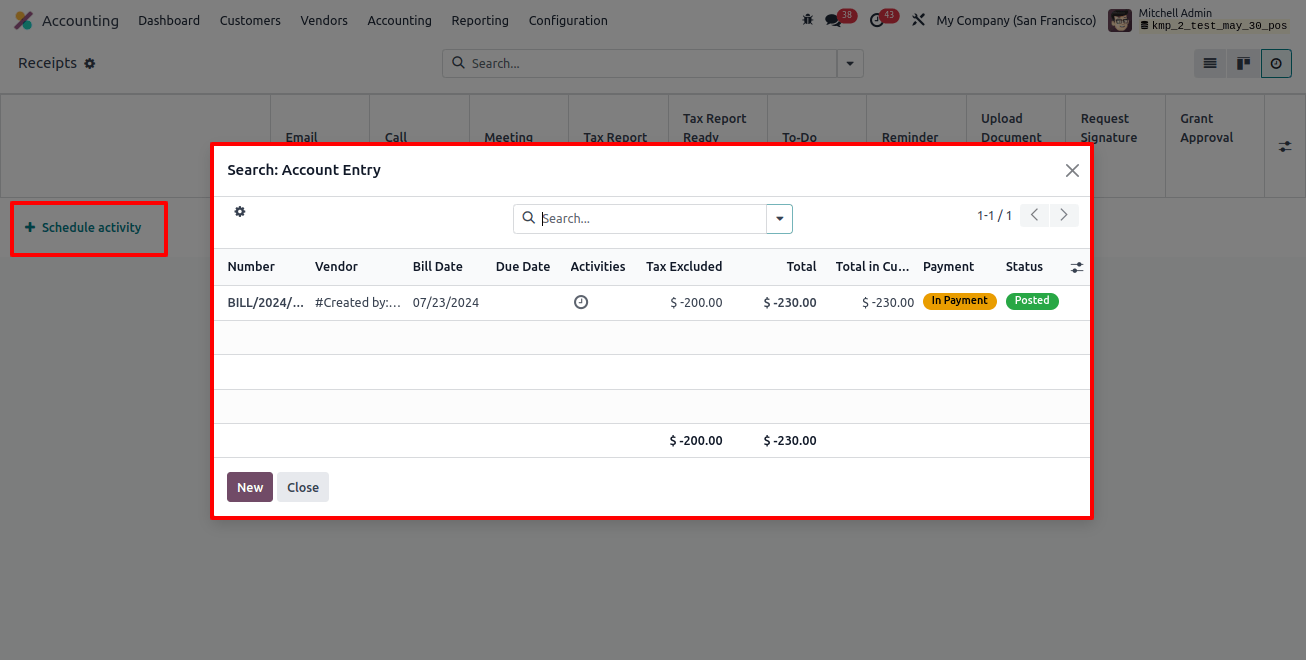
Access the activity view by selecting the ‘Activity’ icon next to the Kanban icon. This window can also schedule activities linked to the receiving order.

From the receipt’s activity view, click the ‘schedule activity’ button to create an activity based on the receipts, then select the receipt from the ‘account entry’ wizard to set an activity.
After selecting the receipt, you can configure the activity in the ‘scheduled activity’ window by selecting the Activity type, summary, due date, and assignee person, as shown in the image below.
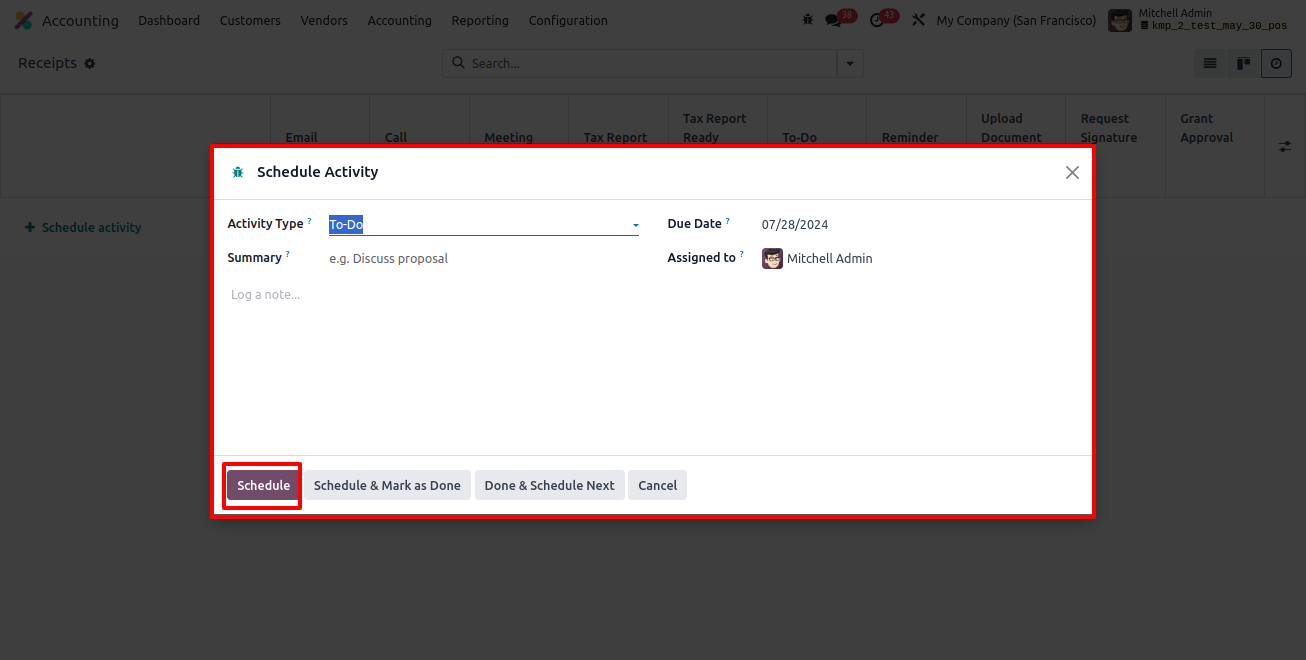
Then click the ‘Schedule’ option to schedule the activity. The ‘Schedule and mark as done’ and ‘Done and schedule next’ buttons can also be used based on your needs.
Odoo 17 Accounting allows users to manage purchase receipts. This is important for managing vendor relationships and maintaining accurate financial records. Businesses may streamline their financial process and keep things moving smoothly using Odoo’s powerful accounting capabilities.
