SMS marketing is an important part for promoting various factors of a business, including events, products, services, and promotions. The Odoo 17 module includes the SMS Marketing module, allowing users to receive flash deals, discounts, and limited-time promotions.
The module can be automated by applying filters to the recipient list, allowing different SMSs to be delivered to different recipients. It efficiently manages all operations and processes, managing concerns and challenges.
The Odoo 17 SMS Marketing module allows companies to focus on planning to grow their business market and increase conversion rates.
Install the SMS marketing module from Odoo 17 applications by looking for it in your database's Apps area. Once added, the SMS Marketing Module will be visible in your database.
SMS Marketing Menu
Install the SMS marketing module from Odoo 17 applications by searching for it in your database's Apps section. Once added, the SMS Marketing module will appear in your database:
* Title: The name of the SMS campaign.
* Responsible: The employee managing the campaign.
* Sent: The total number of SMS messages sent.
* Clicked: The number of recipients who clicked on links within the SMS.
* Status: The campaign's current status (e.g., Draft, Sent).
* Bounced: The number of SMS messages that failed to deliver.

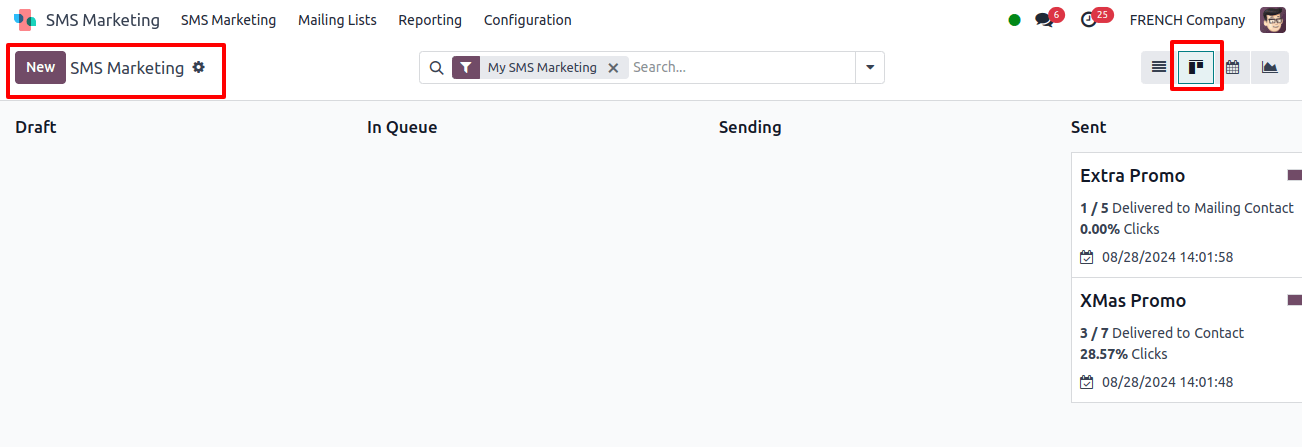
Exploring Different View Formats: The SMS Marketing module allows a variety of view formats to meet different requirements:
* Kanban View: The Kanban View divides campaigns into four stages: Draft, In Queue, Sending, and Sent.
Also, you can do operations such as folding, archiving, or unarchiving stages by clicking the settings button in the upper right corner of each stage.
* List View: Campaigns are shown in a thorough list manner, making it easy to skim through several entries and make bulk actions.
* Calendar View: Calendar View provides a timeline view so you can see when campaigns are scheduled or sent.
* Graph View: Graph Views offers visual insights of your SMS campaign’s performance, including the amount of messages sent, click rates, and bounces over time.
Organizing and Filtering Data
The module offers powerful filtering and grouping options:
Filters and Group By: These tools can help you manage your campaign data depending on a variety of factors, including status, responsible employee, and date range. Custom filters can be designed to meet specific requirements.
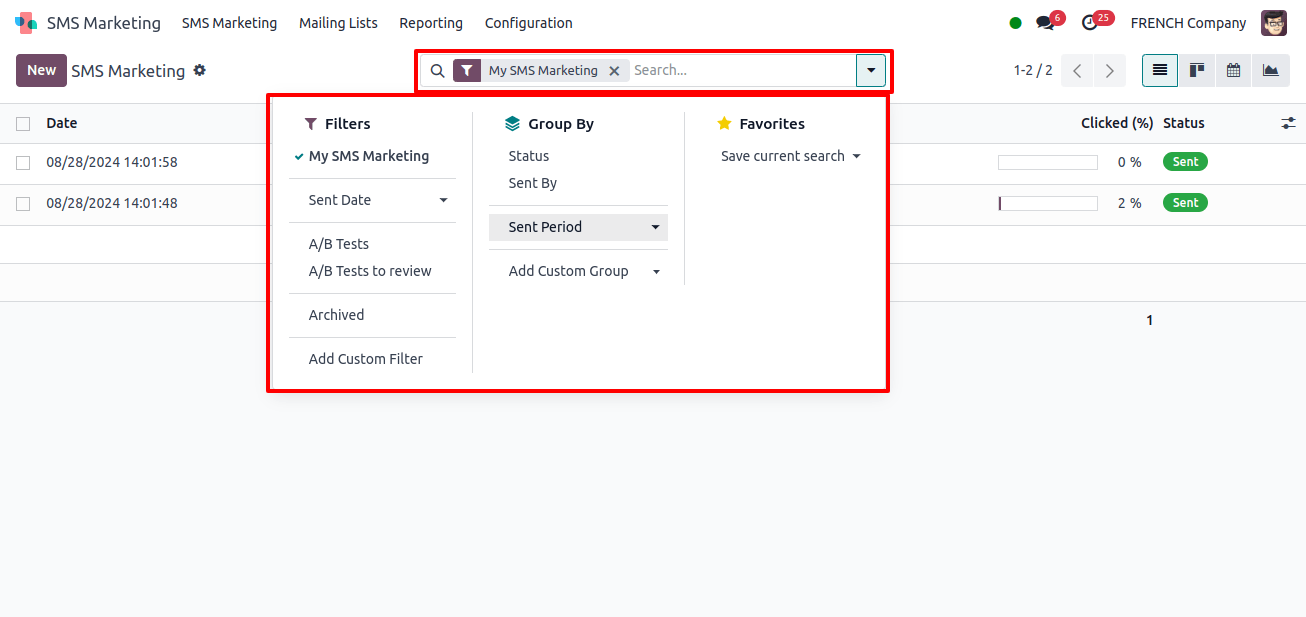
Settings Icon: Located in the Kanban view stages, it provides choices like Fold, Archive All, and Unarchive All for efficiently managing the visibility and storage of your SMS records.
In addition, the List view shows the responsible employee’s photo next to their name. Clicking on this image brings up a chat box, allowing you to instantly start a conversation with the employee right within Odoo.
Creating a New SMS Campaign
To start a new SMS marketing campaign, take these steps:

1. Initiate Campaign Creation:
* On the SMS Marketing dashboard, click the New button to bring up the creation window.
2. Enter Campaign Details:
* Title: Create a suitable internal title for the SMS campaign.
* Recipients: Choose recipients from the drop-down list of available models. Use the platform’s filtering options to make a more specific selection.
For example, to send an SMS to applicants, select Applicant as the recipient category and narrow your list with the Add Filter option.
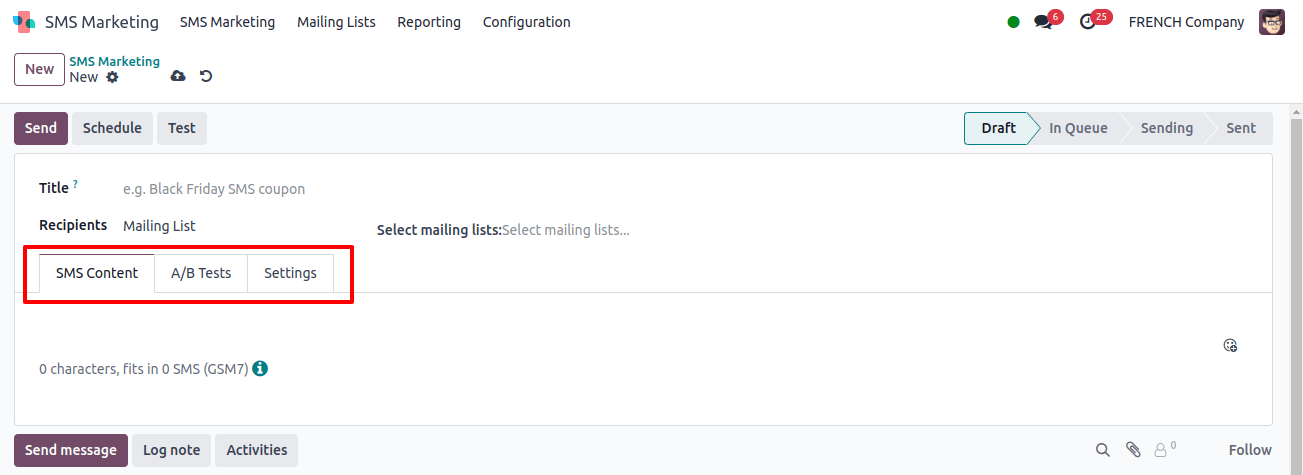
3. Compose the SMS Content:
* In the SMS Content tab, enter the message you wish to send. The module allows you to add smileys to your message to them more engaging.
4. Set Up A/B Testing:
* To access variants in your SMS, use the A/B Tests option.
For example, give 10% of your recipients one version and the other 10% a different variant.
Define the importance for picking the top-performing SMS (for example, highest click rate). Once chosen, the most effective version will be distributed to the remaining recipients on the stated final send date.
5. Configure Additional Settings:
In the Settings page, select the accountable party’s name and specify whether the SMS should include an opt-out link.
6. Save the Campaign:
To save the campaign details, simply input all of the required information and click the Save button.
Sending and Scheduling SMS Campaigns
Once your campaign is ready, you have many options for sending your SMS:
1. Send message Immediately:
Click on the Send button. A confirmation message will appear. After the campaign is completed, the status will change from Draft to Sent after you confirm that the chosen recipients received the SMS by clicking the confirm button.
2. Schedule for Later:
Click the schedule button to Schedule an SMS for a later time and date. A Calendar pop-up will then appear allowing you to select your chosen time and day. After scheduling, the campaign status will be In Queue until the planned time.
3. Test the SMS:
To see how the SMS will appear to recipients, click the Test option. Enter phone numbers in the pop-up window that displays, then click Send to send a test SMS.

Mailing Lists
The Mailing Lists tab in the SMS Marketing module has two sub-menus:
* Mailing Lists:
Displays a list of all mailing lists that have been created in Kanban and List views. Each mailing list preview provides both the list’s name and the quantity of contacts.
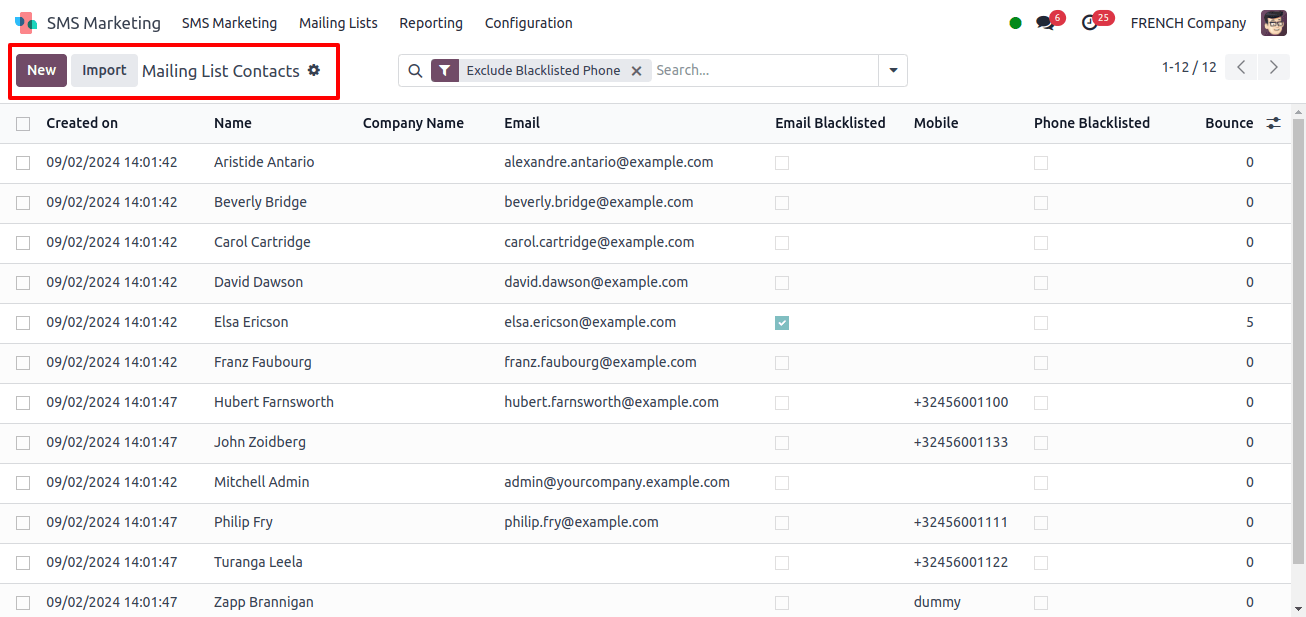
* Mailing List Contacts:
Displays all contacts linked with the mailing lists, including names, companies, email addresses, and phone numbers. You may also discover whether contacts have been blacklisted for email or phone.

Creating and Managing Mailing Lists
1. Creating a New Mailing List:
* In the Mailing Lists window, click the Add New button.
* Enter the name of the new mailing list. Optionally, select the Is Public checkbox to allow recipients to adjust their subscription preferences from the unsubscribe page.
2. Adding Contacts to Mailing Lists:
* To add a new contact, open the Mailing List Contacts window and click New.
* Name, email address, phone number, and other contact-specific tags should be included. Under the mailing Lists tab, select the mailing lists to which this contact should be added.
Exporting and Filtering Contacts
1. Exporting Contacts:
* To export all contact information to an Excel file, click the Export All option. This capability is useful for offline analysis and backup purposes.
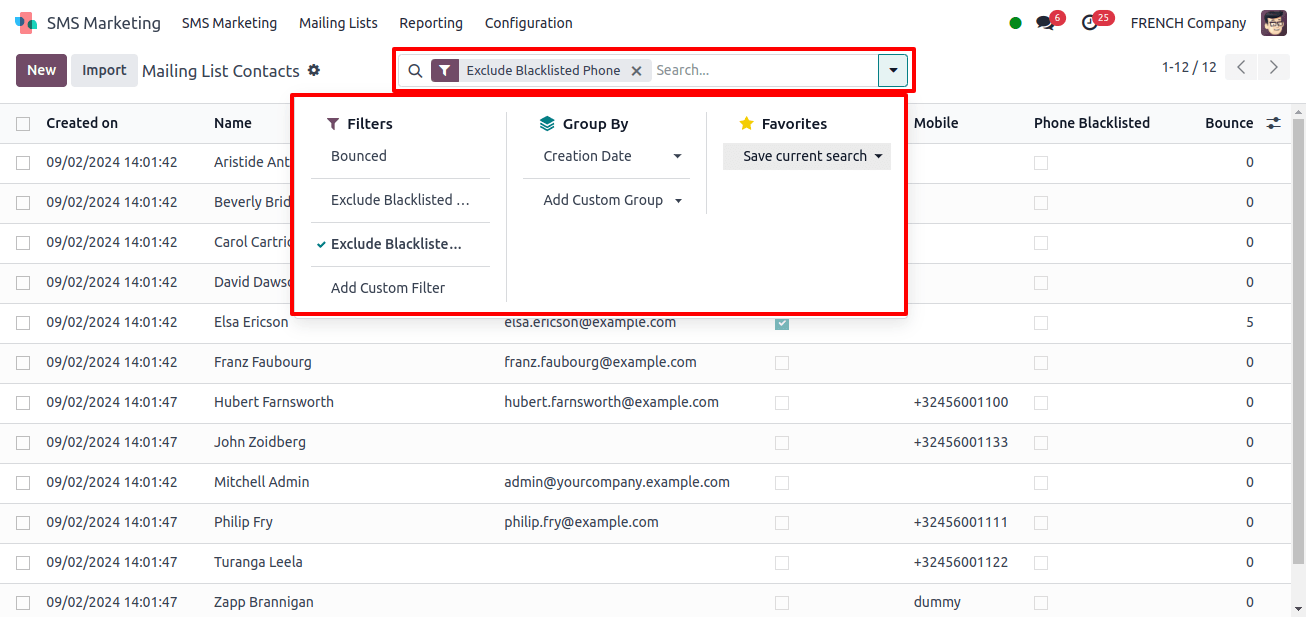
2. Filters and Grouping Options:
* Use the Filters, Group By, and Search features to sort and categorize contacts based on criteria such as creation date, company, or blacklist status.
Reporting Menu
The reporting part of the Odoo 17 SMS Marketing module is important for receiving detailed information into your SMS marketing initiatives. It allows you to expand the effectiveness of your efforts by giving detailed data and analysis.
Accessing the Reporting Section:
Within the SMS Marketing module, go to the Reporting option to see the most recent reports on various aspects of your SMS campaigns.
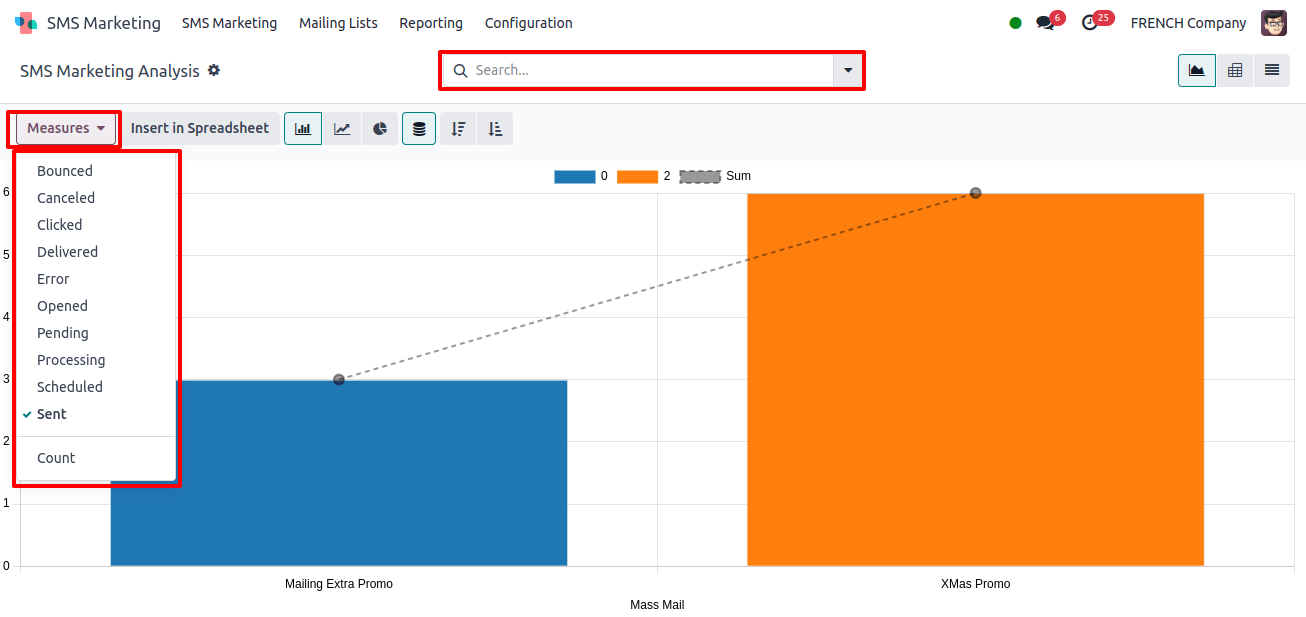
The following is an example of the Reporting fields capabilities, presenting the number of tools and views accessible for analysis.
1. Exploring SMS Marketing Metrics:
The measures page offers a number of measures for analyzing your campaigns, including:
* Bounced: Messages that failed to deliver.
* Canceled: Messages that were canceled before sending.
* Clicked: Links within the SMS that were clicked.
* Delivered: Messages successfully delivered.
* Error: Messages that encountered errors during sending.
* Opened: Messages that were opened by users.
* Scheduled: Messages that are scheduled to be sent.
* Sent: Total number of messages sent.
2. Utilizing Sorting and Visualization Tools:
* The Filters, Group By, Favorites, and Search tabs in the window provide various sorting techniques for organizing and viewing data based on your specific requirements.
* For a more detailed analysis, switch to the Pivot View, which allows you to break down data in an excel file. This view allows you to manipulate and see your data in ways that will yield valuable insights.
Configuration Menu
The Odoo 17 SMS Marketing module makes it easier to manage undesired contacts by allowing you to blacklist phone numbers. This function is required to avoid accidentally sending messages to numbers you want to exclude from your campaigns.
Here’s how to manage blocked phone numbers:
1. Accessing the Blacklisted Phone Numbers Menu:
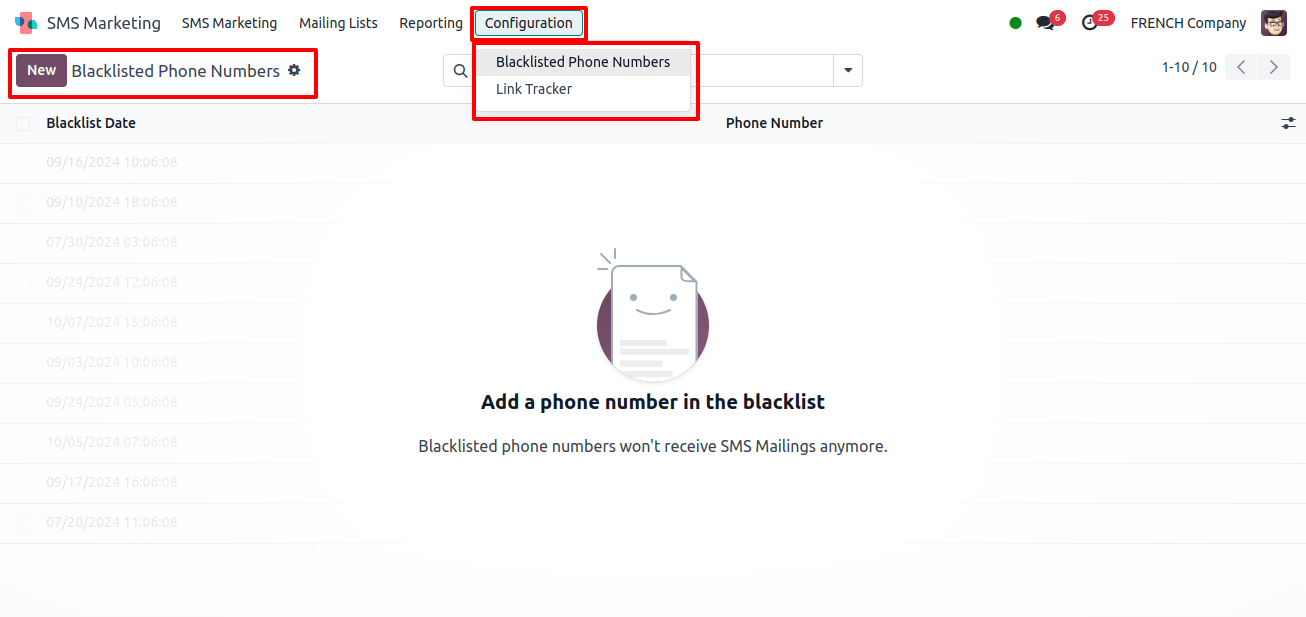
* Go to the SMS Marketing module’s Configuration tab.
* Choose the Blacklisted Phone Numbers menu from the options that appear.
This option allows you to manage phone numbers that should no longer receive SMS communications. When you enter this section, you will get a pop-up window with the blacklist.
2. Viewing and Adding Blacklisted Numbers:
* The window shows a list of phone numbers that have already been blacklisted, along with the Blacklist Date, which indicates when each number was added to the list.
* To add a new phone number to the blacklist, select the new button. This step will open a creation window in which you can input the details of the phone number you want to blacklist.

3. Entering Phone Numbers in E164 Format:
* Enter an globally recognized number E164 format phone numbers in the creation box, save it to the blacklist, and SMS mailings will omit these numbers from future campaigns.
Link Tracker
SMS marketing has one of the greatest engagement rates of all marketing platforms due to its direct and immediate nature. Odoo 17’s SMS Marketing module has a Link Tracker tool that allows you to measure and analyze the potential of SMS marketing.
1. Accessing the Link Tracker:
* To use this tool, go to the Configuration tab and pick the Link Tracker option from the SMS Marketing module. When you enter the Link Tracker, you will see a window that shows detailed information about your SMS marketing links.
![]()
2. Using Filters and Analytical Views:
* The module provides multiple tools to help you refine your analysis, such as Filters, Group By, Favorites, and Search. These choices allow you to classify and categorize your data based on unique analytical requirements.
* Also, the platform has Graph View, which provides a visual depiction of your data.
* By selecting the Graph view menu option, you can create multiple chart layouts, including bar charts, pie charts, and line charts, to help you comprehend your marketing’s performance more effectively.
3. Viewing Link Tracker Details:
* The box shows existing records, including the creation date and time, page title, button label, target URL, and the number of clicks each link has received.
* This window allows the user to go to the targeted pages and view complete click-through data.
![]()
By using these complete tools and functionalities, Odoo 17’s SMS marketing module allows businesses to execute and manage SMS campaigns with precision and ease.
From creating customized messages to access campaign effectiveness, this module has everything you need to maximize your SMS marketing efforts.
