Odoo Expenses simplifies the expenditure management process for businesses by allowing employees to report expenses, which are then reviewed by management and accounting teams to ensure adherence to business policies.
After approval, payments are processed and paid for reimbursement, increasing openness and accountability. To use the program, customers must create spending categories according to their needs.
Configuring Expense Categories
The ‘Expense Categories’ submenu in the Odoo 17 Expense module ‘Configuration’ menu simplifies the management of numerous expense kinds, allowing for more effective payment administration and reimbursement.
This dashboard, as shown below, provides users with a comprehensive list of predefined spending categories organized by Name, Internal Reference, Internal Note, Sales Price, Cost, Vendor Taxes, and Re-Invoice Expenses.

The advanced search bar’s ‘Filter’ and ‘Group By’ choices make it easier to organize and navigate data, while the ‘Favorites’ function lets users rapidly mark frequently visited items.
The ‘New’ button allows you to create a new Expense Category. The presented product form includes form parts such as General Information, Accounting, and Invoicing.
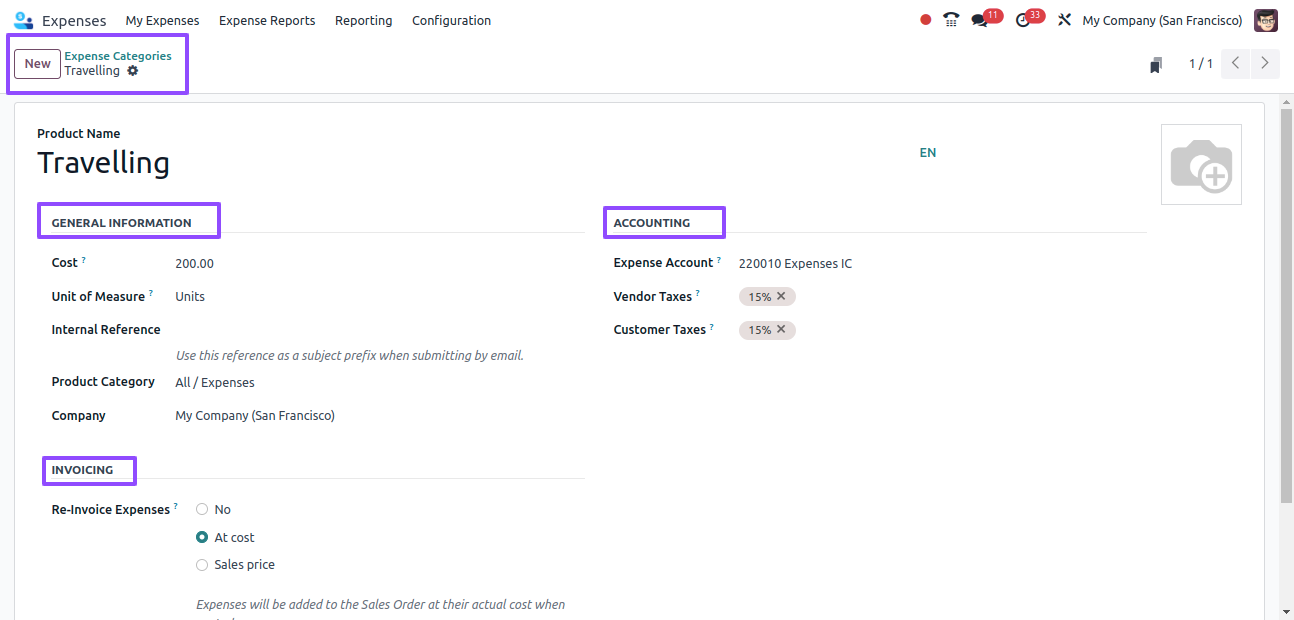
Fill in the Product Name Field and choose the Unit of Measure option from the drop-down menu.
For reimbursement, specify the cost column to a specific amount or leave it at 0.00. If necessary, include an internal reference about the product as a subject line when emailing. Then, select the appropriate product category or set it to ‘All.’ Finally, select the company.
If you’re using the Odoo Accounting app, choose the correct accounting details in the Accounting section, especially the Expense Account, as this affects reports.
In the Vendor Taxes and Customer Taxes boxes, enter a tax rate for each product if applicable. If this option is selected, the taxes will be configured automatically.
The Invoicing section can be used in Odoo’s ‘Reinvoice Expenses’ field to specify whether expenses should be reinvoiced to customers, which is useful for service-based organizations.
Choosing the relevant option will allow you to re-invoice invoices or vendor bills at the cost or sales price. Finally, save the form input and create a new Expense Category.
Generating and Submitting Expenses
The Odoo 17 ERP Expenses module simplifies business expense management by allowing employees to record expenses, which managers can swiftly analyze and approve.
Accountants also benefit from the capacity to record and proceed with payments for future transactions.
My Expenses
On the My Expenses tab, users may view their expense history, which includes details such as the Expense Date, Description, Employee, Company, Paid By, Status, and so on.
Users can also look at reimbursement amounts, validation fees, and spending reports at the top of the screen. This provides a good view of the current state of the costs.

With the Scan symbol, you can add a new expense by selecting the New icon in the My Expenses box, begin a new report by clicking the Create Report button, or upload an expense report directly from your system. This will open the new Expense configuration, as seen below.
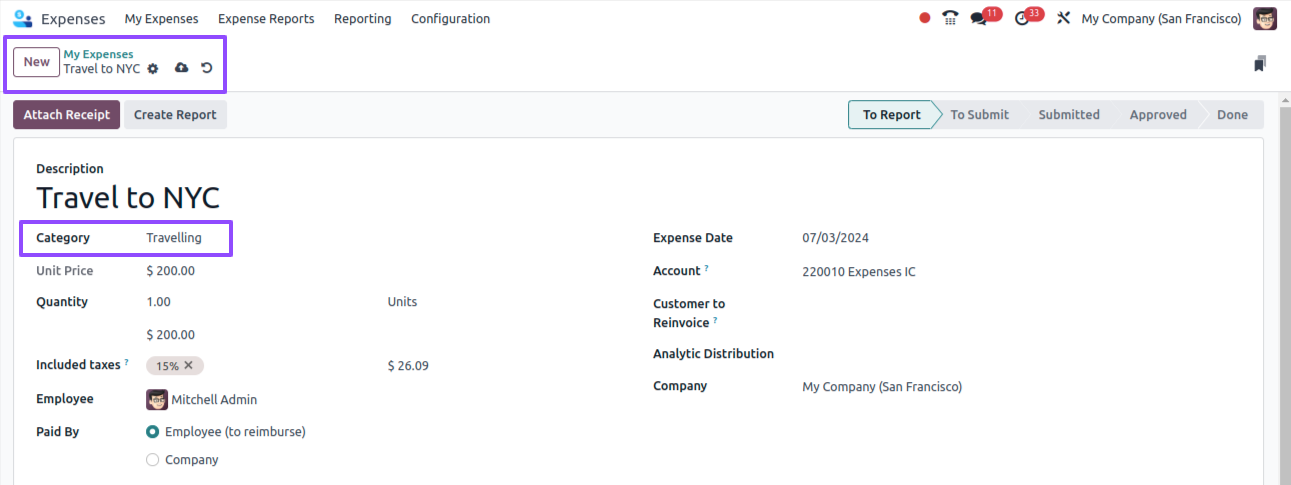
After entering information about your expenses in the Description section of the new window, select the appropriate category. Here, I’m selecting the predefined category ‘Travelling.’
The Categories box allows us to select from several predefined expense categories.
We can also enter the total amount of an expense in the Total field. You can select a specific employee’s name from the Employee option.
In the Paid By section, you can also select the payer for the expense. Paying the employee and the company together is an option.
If the worker receives remuneration, the corporation will compensate him for any additional costs incurred later.
We can also supply the Expense Date and Bill Reference, which indicate when your item was billed.
You can select the projected spending account from the Account menu. We may also decide on the business name and invoice category for clients.
After updating the required expense fields, save your data, and Odoo 17 will automatically save each item of data.
Furthermore, as shown in the image below, you can designate the expenditure as To Report, To Submit, Approved, Refused, Submitted, or Done.

Attaching Receipts and Creating Reports
To submit proof of the expenditure request, click the Attach Receipt icon and select any expense receipts from your device’s storage.
Selecting the Create Report button on the My Expenses page allows us to rapidly build an expenditure report and see a new button named Submit to Manager with the specifics of this specific expense in an expenditure report summary view, as seen below.
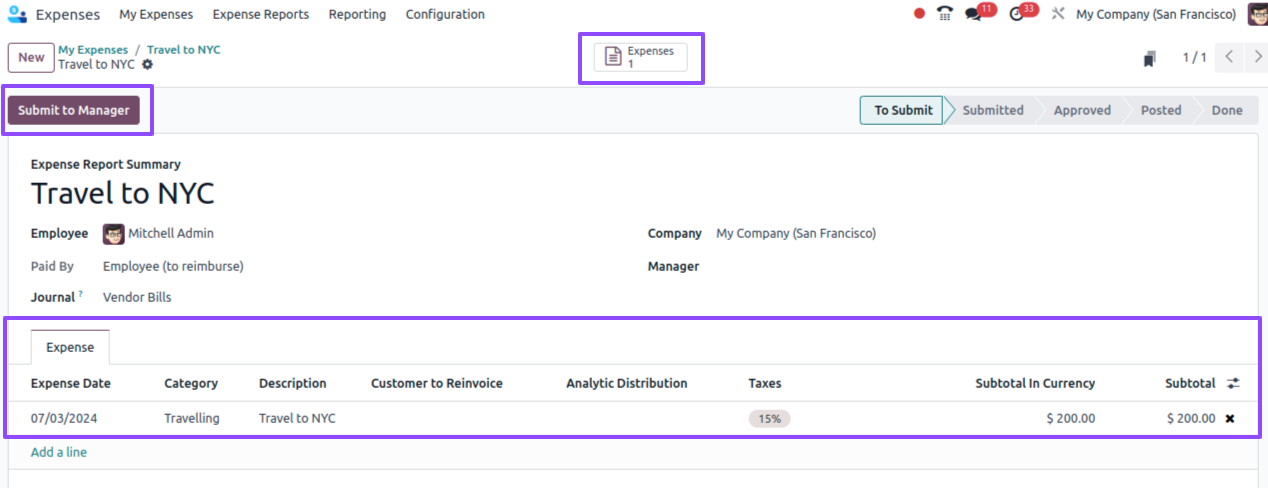
Use the Expenses smart button to open the Expense configuration form and make changes.
We can also enter the journal and the name of the relevant Manager in the fields supplied within the form view.
Submitting the Request
Clicking the Submit to Management button sends the cost request to the right management, and we can see the Approve, Refuse, and Reset To Draft buttons.

After receiving the request, the management or the right person can approve, reject, or draft it based on the requirements.
Odoo 17 simplifies financial transaction administration for businesses by creating expense categories adapted to individual requirements.
This improves financial visibility and decision-making by optimizing financial management methods, resulting in greater control, transparency, and financial health.
