Product quality is important for businesses to retain customer satisfaction, comply with legislation, and protect their brand name.
Businesses can benefit from Odoo 17’s improved Quality module, which includes several strong quality checks to streamline quality management operations and increase overall product quality.
In this blog, we’ll look at the many types of quality checks available in Odoo 17 and how they help to improve product quality at different stages of production.
Advantages of Using the Quality Checks in Odoo 17
Odoo 17’s quality checks improve quality management processes by offering a centralized platform for developing, running, and tracking quality checks across the production lifecycle.
Improved Product Quality:
Businesses can improve product quality and reliability by enforcing set practices, conducting thorough inspections, and verifying specification compliance.
Enhanced Compliance:
Odoo 17’s quality checks assist businesses in meeting industry norms, quality standards, and consumer expectations by methodically validating product quality and conformance.
Real-time Monitoring and Analysis:
Odoo 17 allows businesses to monitor quality inspections in real time, evaluate inspection data, and spot trends or patterns to continually improve quality management methods.
Quality inspections involve people manually inspecting products to ensure their quality.
In Odoo, these inspections can be performed on individual products inside the same inventory activity or manufacturing order.
Inspections can be scheduled automatically at predefined intervals using a quality control point.
These checks are seamlessly integrated into manufacturing or inventory operations, guiding personnel to fulfill their orders effectively.
Different Odoo 17 Quality Check Types:
Let’s look at some of the main sorts of quality checks offered in Odoo.
Instructions Quality Check:
Instruction quality checks in Odoo 17 guarantee that operators follow set instructions or recommendations during the manufacturing process.
Standardized procedures can help businesses maintain consistency and accuracy in their production operations.
These checks help to avoid errors, reduce variability, and guarantee that items are created by specifications.
There are several methods for doing quality checks on instructions. If a quality check is associated with a specific manufacturing, inventory, or work order, it can be executed immediately within that order. Alternatively, the check can be completed straight from the dedicated website.
To start the processing of an instructions quality check from the check’s page, go to Quality > Quality Control > Quality Checks. Then, select a quality check and follow the instructions to complete the check.
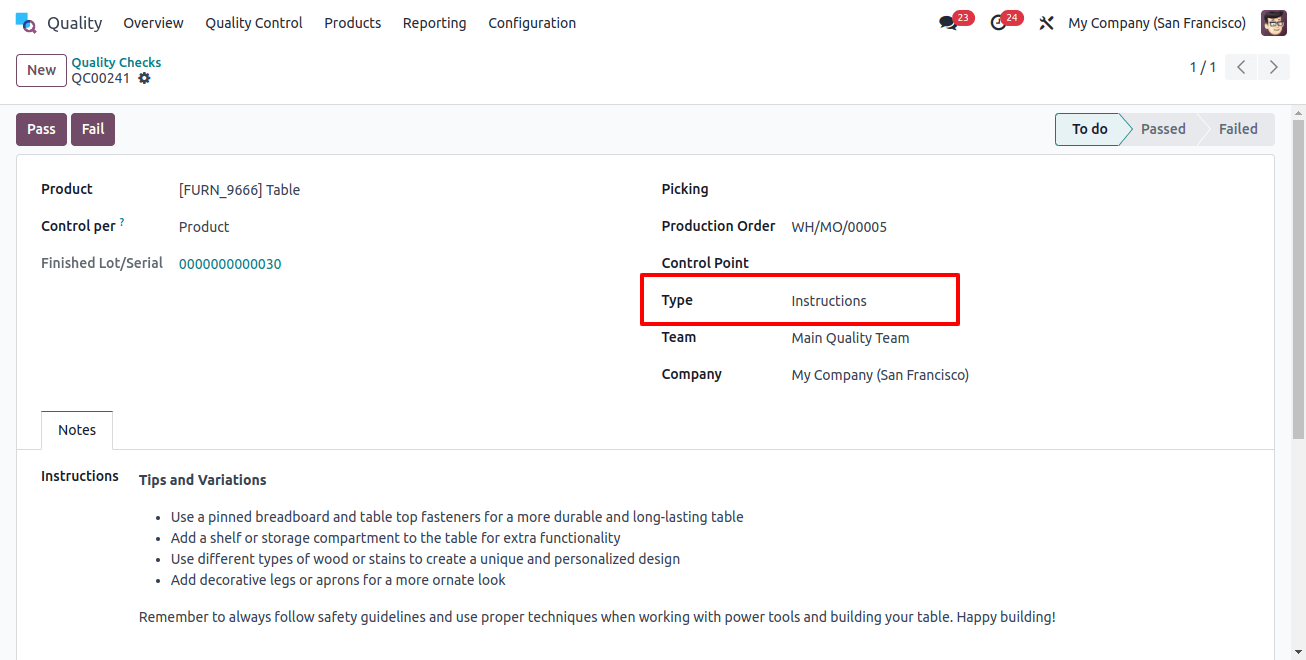
For products that meet the quality criteria, click the pass button above the quality check form. In circumstances where the product does not satisfy the criteria, select the fail button instead.
To begin a quality check on an order, select a manufacturing or inventory order (such as receipt, delivery, or return).
For manufacturing orders, go to Manufacturing > Operations > Manufacturing Orders and choose the necessary order.
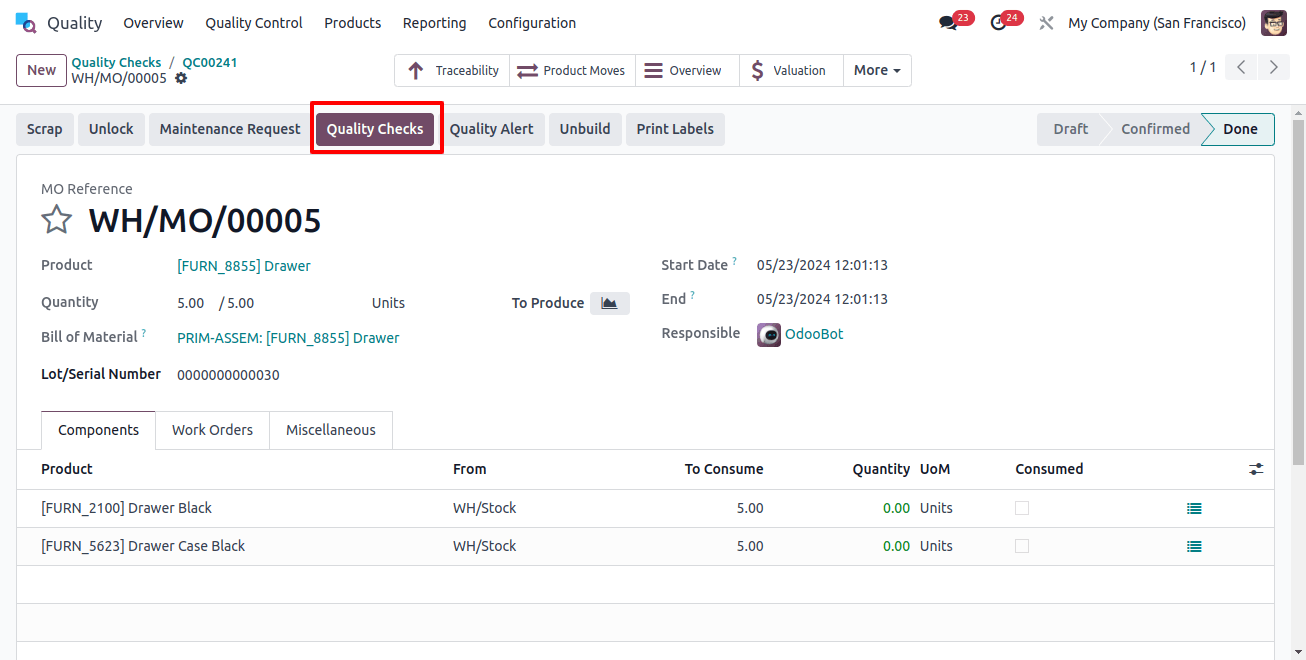
When the desired order is selected, a purple ‘Quality checks’ button will appear above it.
Clicking this button will open the Quality check pop-up window, where any quality checks linked with the order can be completed.
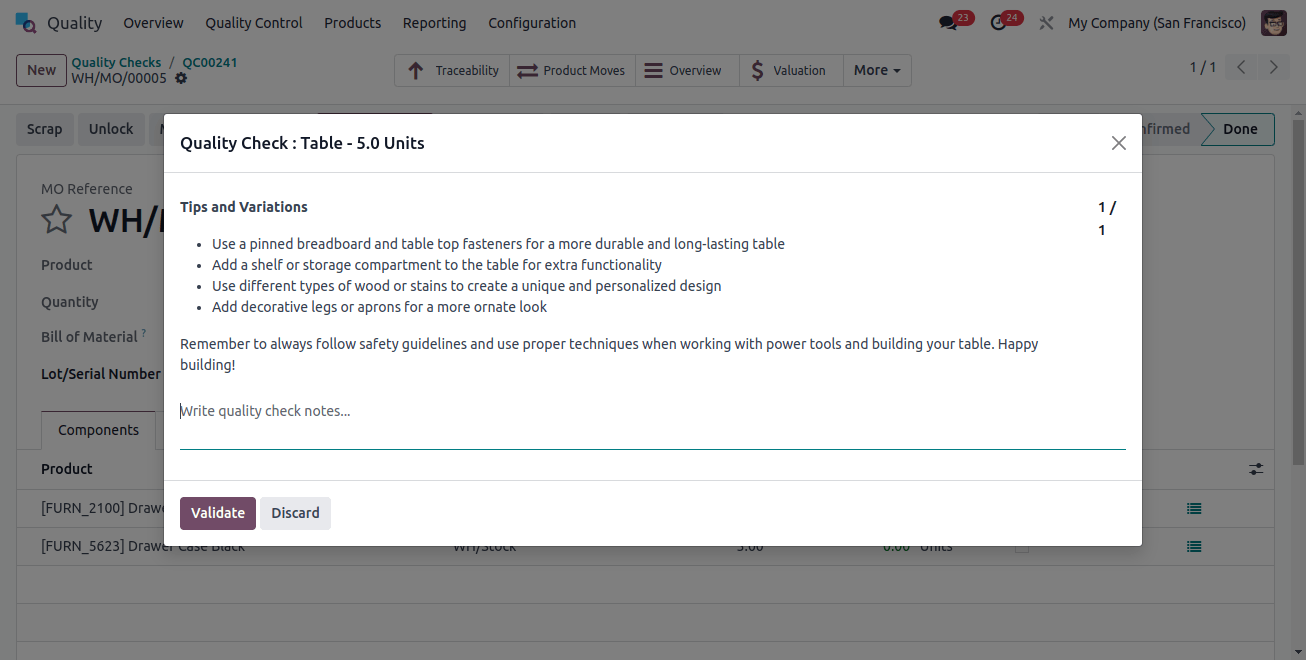
To complete an instruction quality check, follow the steps in the Quality check pop-up window. Once you’ve completed all the important steps, click ‘validate’ to confirm that the check is complete.
If any flaws or defects are discovered during the quality check, it may be required to generate a quality alert to tell the team.
Pass-Fail Quality Check:
Pass-Fail quality checks in Odoo 17 verify whether a product fulfills predefined standards. Products are tested against specified quality standards and are either approved or rejected based on these factors.
Pass-fail checks are a quick and simple approach to evaluating product quality, allowing businesses to uncover nonconformities and take corrective action quickly.
Pass-fail checks include a text field that allows the author to specify the particular standard required for a product to pass the review.
There are two primary approaches for setting pass/fail quality tests. First, a single check can be manually written.
Second, a Quality Control Plan (QCP) can be set up to automatically generate checks at specific times.
Use the following steps to begin a single pass-fail quality check:
1. Go to Quality > Quality Control > Quality Checks, and then click "New".
2. Select pass-fail quality check from the type drop-down field.
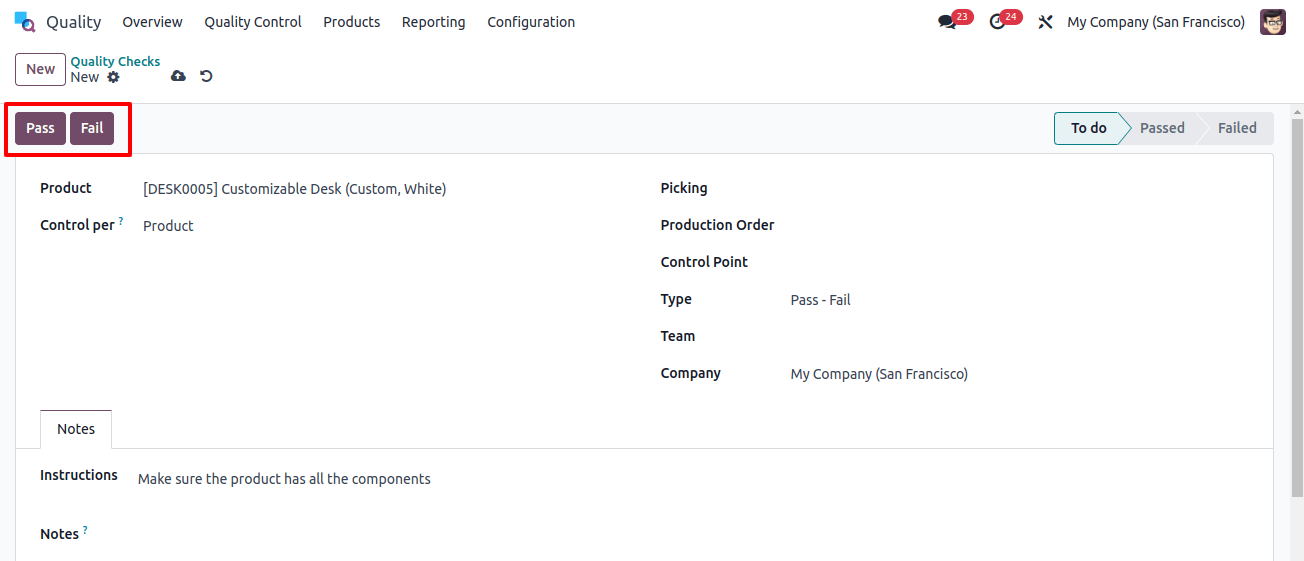
3. Choose the quality team overseeing the check from the Team drop-down option.
4. Proceed to the Notes section and include instructions for conducting the quality check, as well as the criteria that must be met for the check to pass.
If the conditions are met, click the "Pass" button in the top left corner of the page. If the criteria are not met, select the "Fail" button instead.
To create a Quality Control Plan (QCP) that automatically creates Pass-Fail quality inspections, follow these steps:
1. Go to Quality > Quality Control > Control Points and click "New".
2. Select the Pass-Fail quality check option from the Type drop-down menu.
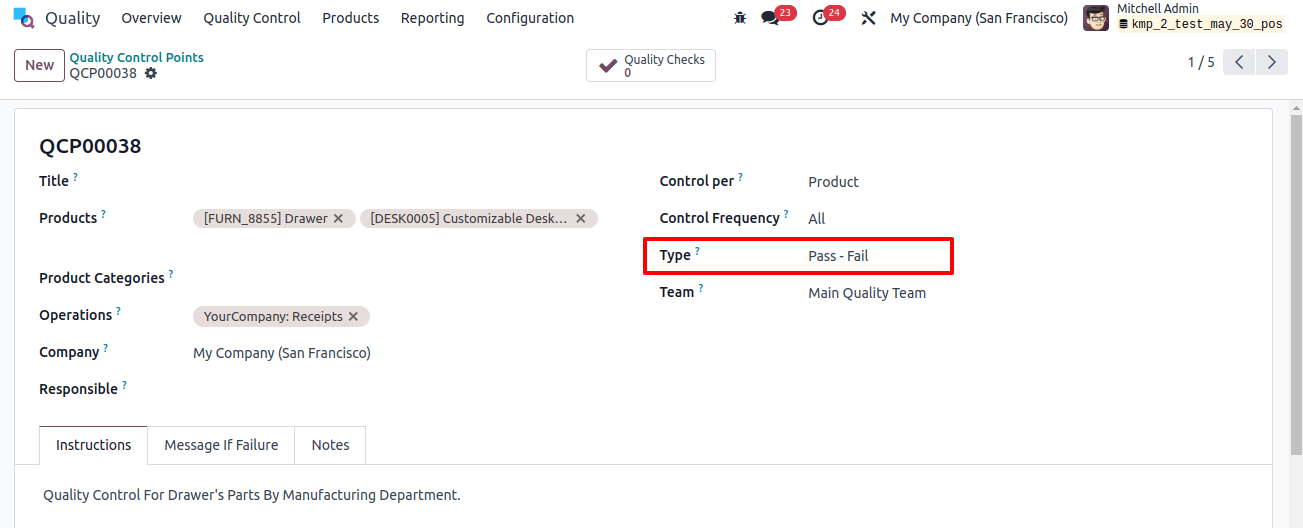
3. From the Team drop-down field, select the quality team handling the QCP-generated checks.
4. In the Instructions text section, explain how to conduct the quality check and the standard to pass.
To perform a pass-fail quality check on an order, choose the relevant manufacturing or inventory order for evaluation.
To access manufacturing orders, go to Manufacturing > Operations > Manufacturing Orders.

After selecting the manufacturing or inventory order, you'll see a purple "Quality Checks" button at the top of the order screen.
Clicking this button opens a Quality Check pop-up window that displays all the quality checks required for that purchase.
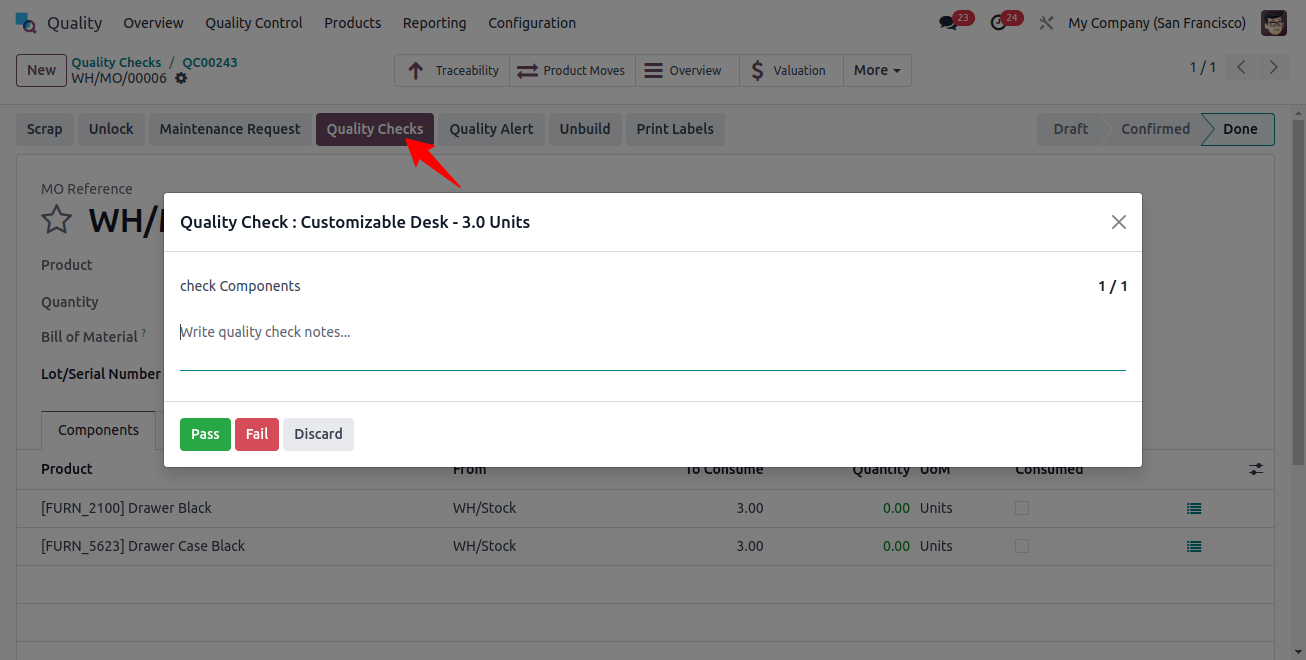
To run a Pass-Fail quality check, follow the instructions on the Quality Check pop-up box. If the conditions are met, click the "Pass" button at the bottom of the window. If the criteria are not met, select the "Fail" button instead.
Measure Quality Check:
Measure quality checks are measurable inspections of product qualities such as dimensions, weight, and volume.
Odoo 17 allows businesses to set particular standards for each product attribute.
During production, items are measured against these criteria to verify they fit the specifications.
Measure quality checks give exact measurements that allow businesses to precisely assess product quality and standard compliance.
To guarantee that the quality of the check passes, the recorded measurement must fall within a given range of a norm value. There are two major ways to create quality checks.
One option is to manually create a single check. Alternatively, a quality control check can be configured to generate checks at predetermined intervals.
Use these steps to create a single Measure quality check:
1. Go to Quality > Quality Control > Quality Checks, and then click "New".
2. Select the Measure quality check option from the Type drop-down menu.

3. Choose the quality team managing the check from the Team drop-down option.
4. Go to the Notes tab and enter instructions for taking the measurements in the instructions text field.
Once the measurement is received, enter it into the Measure section of the quality check form. To manually assess if the check passes or fails, select "Pass" or "Fail" from the top-left corner of the check.
Following are the steps to make a QCP that automatically generates Measure Quality checks:
1. Go to Quality > Quality Control > Control Points and click "New".
2. Select the Measure quality check option from the Type drop-down menu. This operation reveals two new fields: Norm and Tolerance.
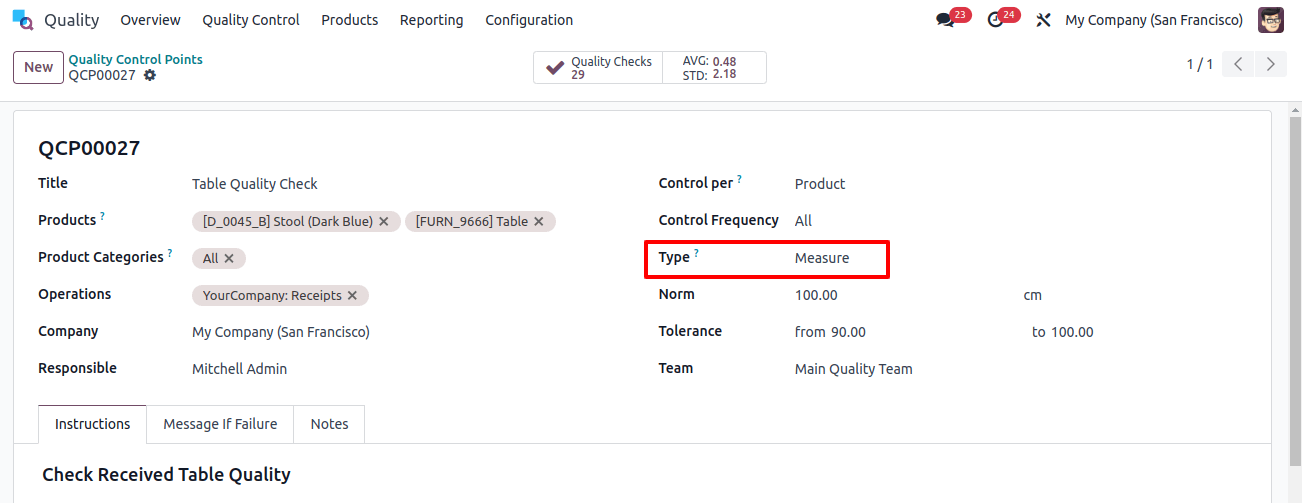
3. In the Norm field, use the first text-entry field to enter the ideal measurement the product should meet. Use the second text entry form to indicate the unit of measurement.
4. The Tolerance field contains two subfields: "from" and "to". Use the "from" box to provide the minimum permissible measurement, and the "to" field to specify the maximum acceptable measurement.
5. Choose the quality team in charge of managing the checks generated by the QCP from the Team drop-down list.
6. In the Instructions text section, describe how the measurement should be taken.
To perform a Measure quality check on an order, choose the manufacturing or inventory order (reception, delivery, return, etc.) for which the check is required. For manufacturing orders, go to Manufacturing > Operations > Manufacturing Orders and choose the appropriate order.
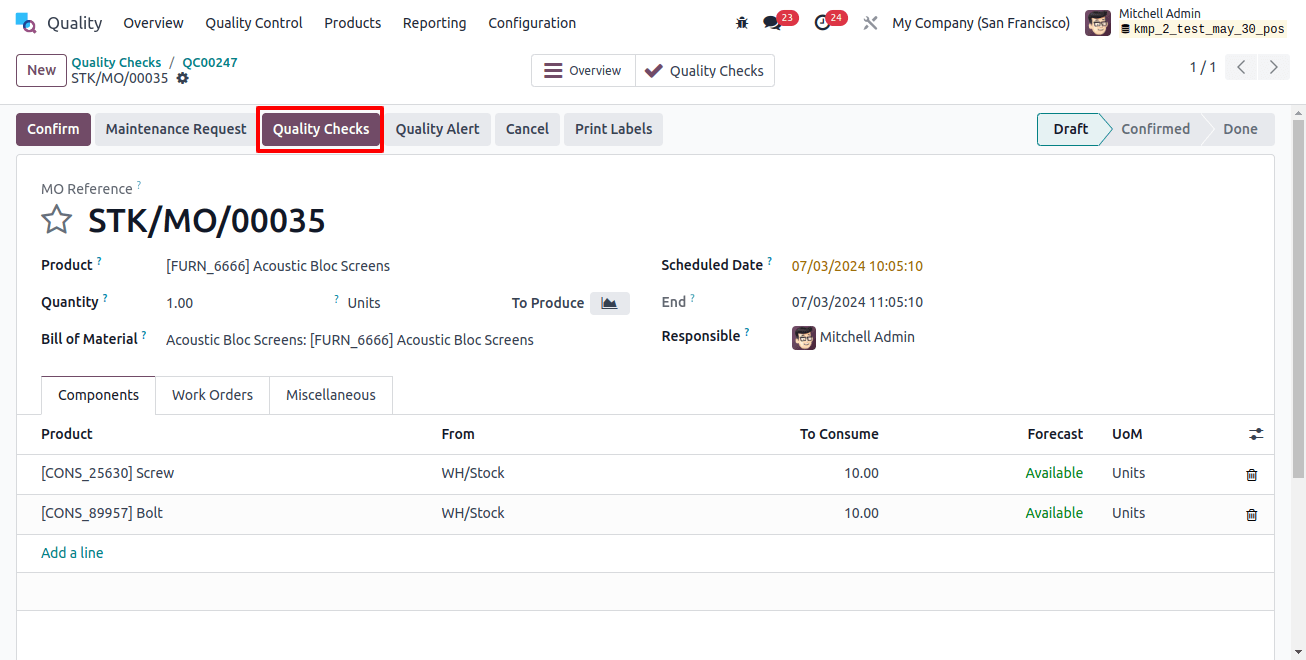
When you pick the order, a purple "Quality Checks" button will appear at the top of the page.
Clicking this button opens the Quality Check pop-up window, which displays the needed quality checks for the order.
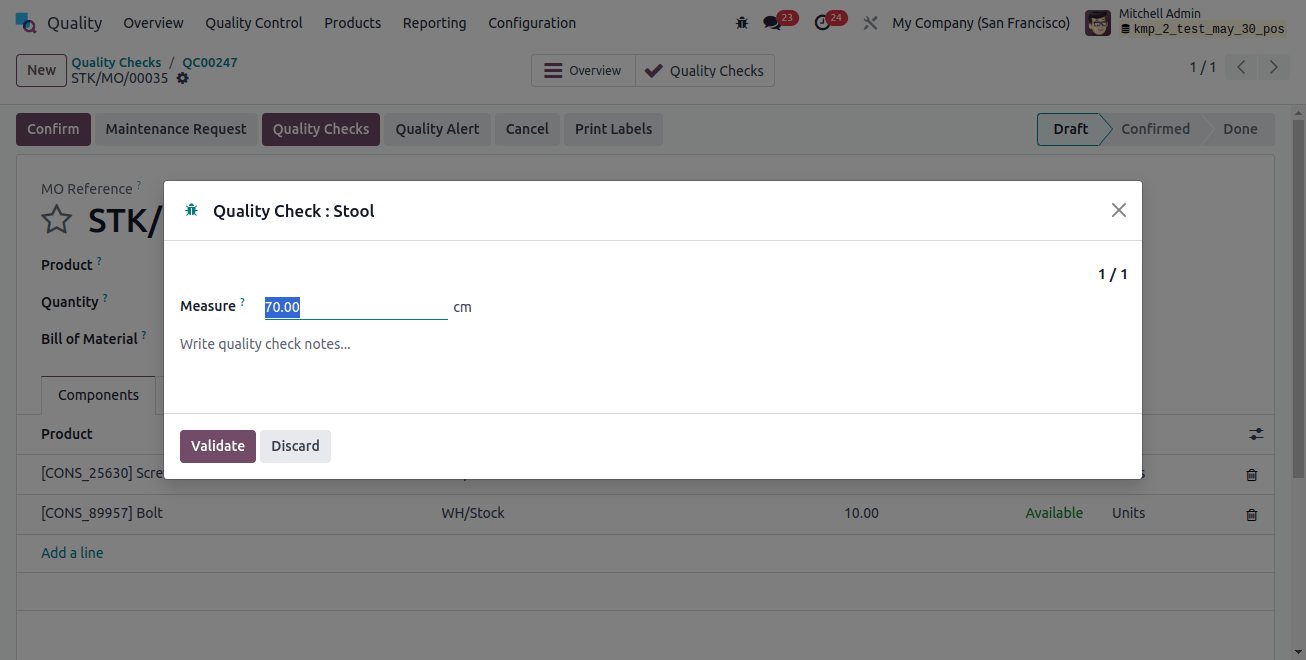
To complete a Measure quality check, measure the product as directed. Next, enter the measured value into the Measure field in the pop-up window. Finally, click the "Validate" button to save the recorded value and complete the Measure quality check.
The quality check will pass if the entered value falls under the range specified in the Quality Control Plan (QCP) section on tolerance.
The pop-up window will close, allowing you to finish processing the manufacturing or stocking order as usual.
If the supplied value is outside the specified range, a second pop-up window named "Quality Check Failed" appears.
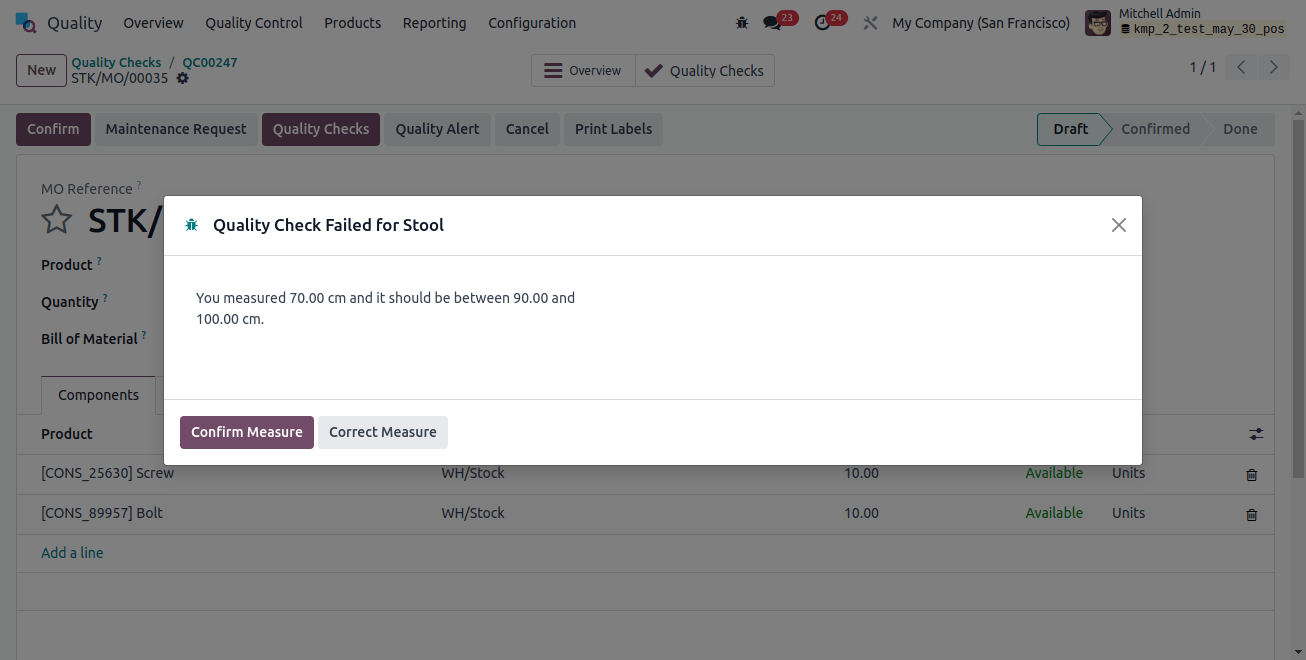
The body of the pop-up will display a warning message that reads, "You measured [X] units and it should be between [Y] units and [Z] units," as well as any instructions set in the Quality Control Plan's "Message If Failure" tab.
There will be two buttons at the bottom of the pop-up window: "Correct Measure" and "Confirm Measure."
If a measurement requires adjustment, select "Correct Measure." This operation reopens the Quality Check pop-up window. Enter the adjusted measurement in the Measure area and click "Validate" to complete the verification.
If you entered the measurement accurately, click "Confirm Measure" instead. This action will lead to the quality check failing.
Take a Picture Quality Check:
"Take a picture" quality checks in Odoo 17 entail photographing items or manufacturing processes for visual analysis.
By using image capture functionality in quality inspection, businesses may visually examine product quality and spot defects.
Images can identify problems such as surface flaws, irregularities, or departures from quality requirements.
Taking photo quality checks helps to improve quality control by providing visual proof and allowing for a more thorough inspection.
"Take a Picture" checks require adding a picture so the quality team can review it.
Take a Picture quality checks can be set up in two ways: manually setting individual checks or designing a Quality Control Plan (QCP) to create checks at predetermined intervals.
To make a single Check the quality of the picture by doing the following:
1. Go to Quality > Quality Control > Quality Checks, and then click "New".
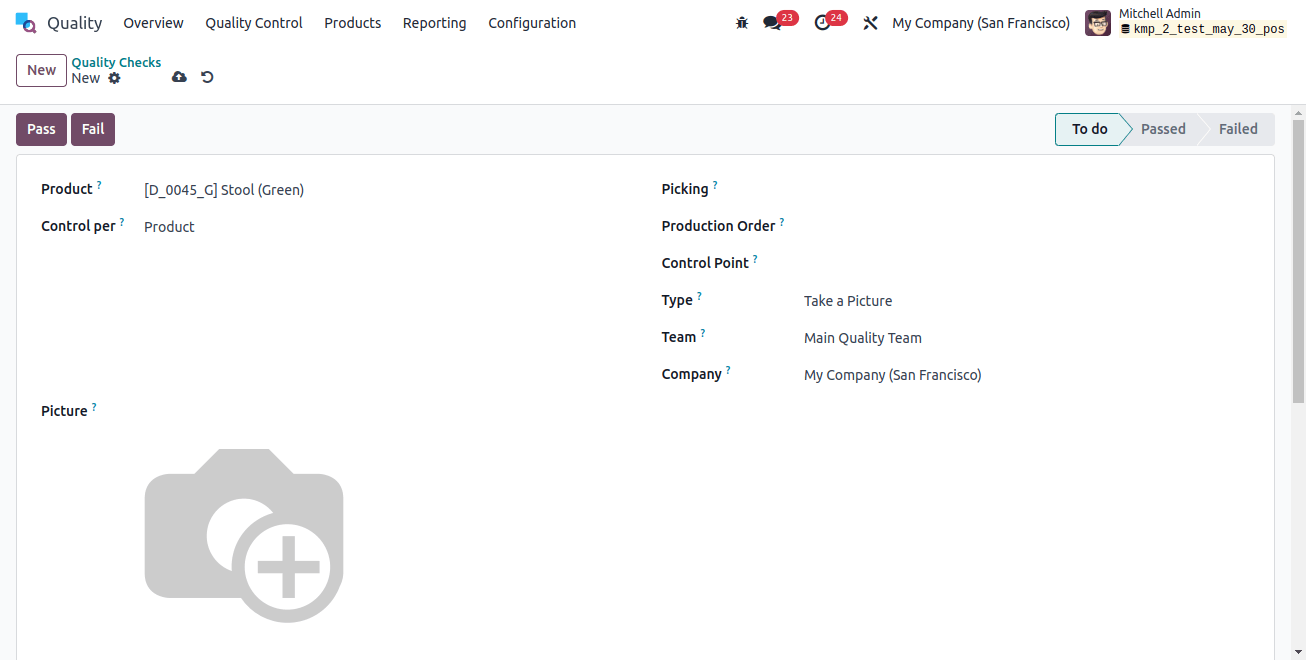
2. Select the Take a Picture quality check option from the Type drop-down menu.
3. Choose the quality team managing the check from the Team drop-down option.
4. In the Notes tab's Instructions text field, explain how to take the picture.
To complete a "Take a Picture" quality check from the check's page, take the picture as directed. Make sure the image is saved to the device being used for the quality assessment (computer, tablet, etc.).
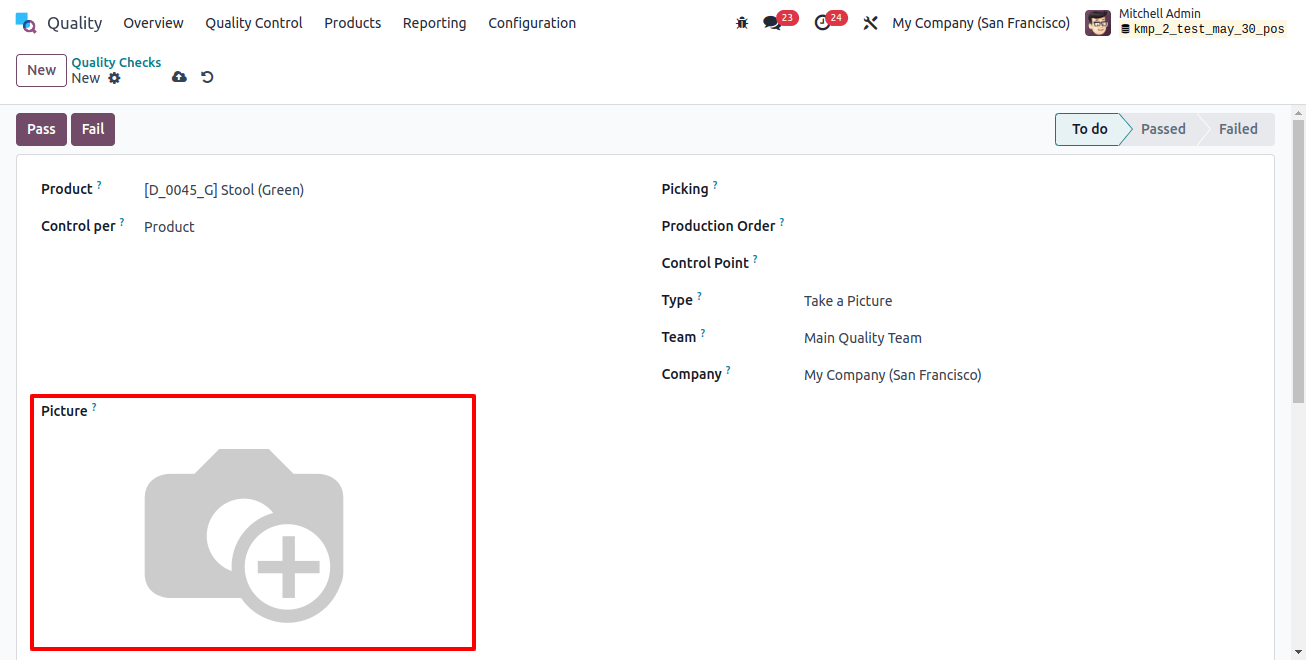
Click the?? (pencil) button in the Picture section to launch the device's file manager. Locate the image in the file manager, then pick it and click the Open button to attach it.
To set up a Quality Control Point (QCP) that automatically creates "Take a Picture" quality checks, follow the steps listed below:
1. Go to Quality > Quality Control > Control Points.
2. To set up a new QCP, click "New".
3. Complete the new QCP form as follows: Select "Take a Picture" quality check type from the "Type" drop-down menu.
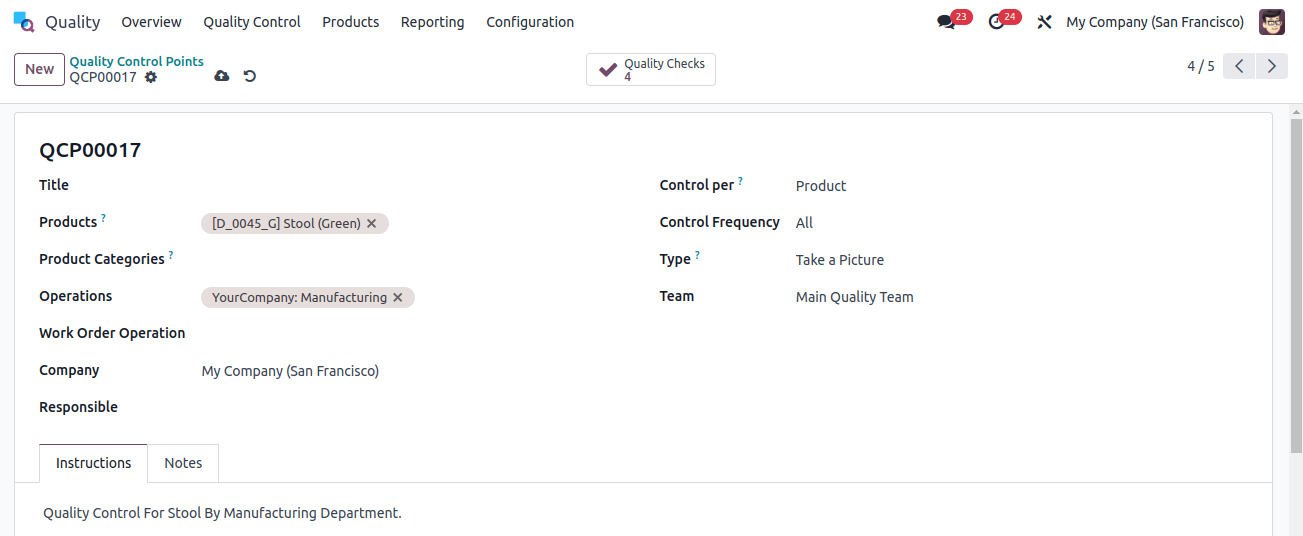
4. In the "Team" drop-down option, pick the quality team managing the QCP-generated checks.
5. In the "Instructions" text section, provide clear directions for taking the photo.
To do a "Take a Picture" quality check on an order, choose the manufacturing or inventory order (reception, delivery, return, etc.) that requires a quality check.
To find manufacturing orders, go to Manufacturing > Operations > Manufacturing Orders and click on the required order.

On the selected order page, there is a purple "Quality Checks" button at the top. Clicking this button opens the Quality Check pop-up window, which lists all the quality checks required for that order.
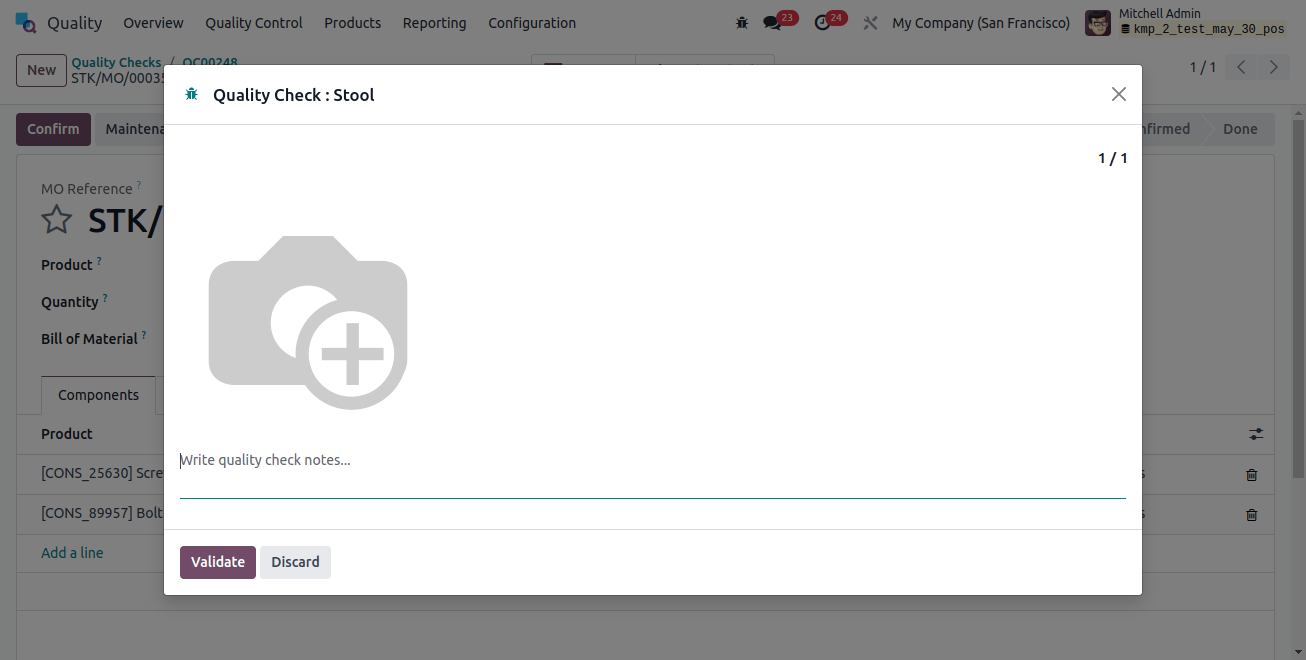
Follow the steps outlined in the Quality Check pop-up window for taking the picture. Ensure that the image is saved on the device used to do the quality check (computer, tablet, etc.).
In the Picture section, select the "Take a Picture" button to access the device's file management.
Navigate to the image in the file manager, select it, and click "Open" to attach it. Finally, click "Validate" on the Quality Check pop-up window to finish the quality check.
In today’s competitive market, keeping excellent product quality is important to corporate success.
Odoo 17’s extensive quality control module helps businesses reach this aim by providing a wide range of quality tests targeted to various production settings.
Businesses can improve product quality, maintain compliance, and increase customer satisfaction by implementing instructions, pass-fail, measurements, and visual checks.
Odoo 17 transforms quality management into a competitive advantage, allowing businesses to deliver extraordinary products that satisfy the highest standards of excellence.
